

How to Import DNG and XMP Presets into Lightroom Mobile
If you are struggling to import presets into the Lightroom Mobile app, you are definitely not alone. For a long time, mobile users couldn't import XMP-based presets and had to rely solely on DNG files. Today, however, you can use both formats!
Whether you are working with DNG or XMP files, and whether you have an active Adobe subscription or are using the free version, this complete guide will show you exactly how to import your presets and streamline your editing workflow.
How to Import DNG Presets (With an Adobe Subscription)
DNG presets are still incredibly common for mobile users. Essentially, the preset comes attached to a DNG image file, which acts as a vehicle to transport the preset into your app. Here is how to load them:
- Download and Extract: Download your preset pack and locate it in your browser's downloads folder. Save the file to the Files app on your phone (creating a dedicated folder for your presets makes them easier to find later). If the downloaded file is a ZIP, be sure to tap on it to extract the DNG files inside.
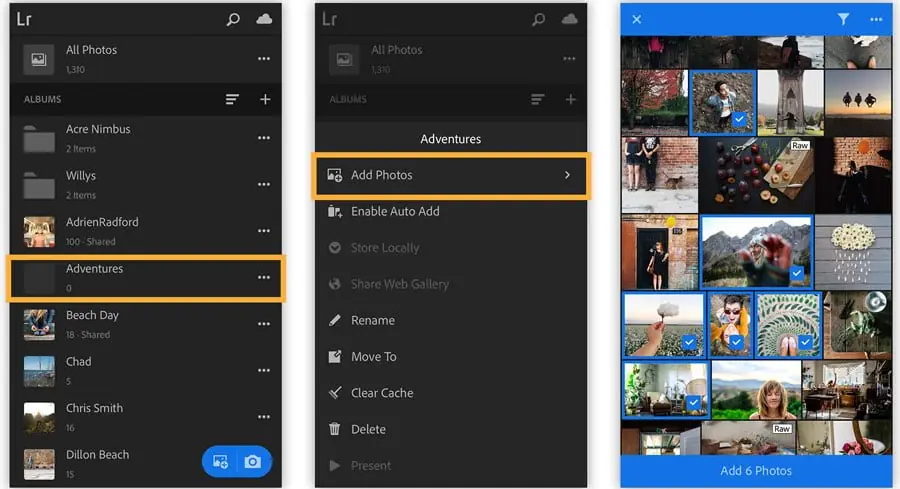
- Import to Lightroom: Open the Lightroom Mobile app and make sure you are in the Lightroom tab. Tap the blue icon with a little image and a plus sign in the bottom right corner, then select Add photos from files.
- Select Your Files: Navigate to the folder you created in your Files app, select all the extracted DNG images, and tap "Open" to import them into your Lightroom gallery.
- Create the Preset: This is where it gets a little tedious. Open one of the newly imported DNG files, tap on Presets in the bottom menu, and ensure you are in the Yours tab.
- Save and Group: Tap the three dots in the top right corner and select Create preset. Under "Preset Group," select "Create new preset group" and name it after your preset pack. Then, give the individual preset a name (usually, the correct name is written directly on the DNG image itself) and hit the checkmark.
- Repeat: Because DNG files must be saved individually, you will need to repeat this "Create preset" process for every single DNG file in the pack until they are all saved to your device.
How to Import DNG Presets (Without a Subscription)
If you aren't subscribed to Adobe, you won't see the import button in the bottom right corner of the Lightroom tab. Don't worry, the workaround is very simple:
- Save to Camera Roll: Open your Files app, locate your extracted folder of DNG files, select all of them, and tap Save Images to save them directly to your phone's camera roll.
- Import via Device Tab: Open Lightroom Mobile and navigate to the Device tab. Here, select the DNG images from your camera roll and tap Import.
- Save Your Presets: Switch back over to the Lightroom tab. Your DNG files will now be in your gallery! From here, simply follow the exact same preset creation steps outlined in the section above. Once you are done, you can delete the original DNG files from your device to save space.
How to Import XMP Presets (The Easy Way!)
If your presets were delivered as XMP files, today is your lucky day because the process requires significantly less work. XMP files allow you to import entire folders at once without saving them individually. (Note: All EverPixel premium collections include instant-install files for maximum efficiency).
Pre-Installation Checklist: Set Up for Success
Before importing your new assets, confirming these few basics will ensure a seamless experience and prevent common technical hurdles.
- Update Your App: Ensure Lightroom Mobile is updated to the latest version via the App Store or Google Play.
- Account Sync: Confirm you are signed into the correct Adobe account to enable cloud synchronization.
- Storage Check: Verify that your device has enough available storage space for new high-resolution data.
- Full Download: Ensure the preset ZIP file is completely downloaded to your device before attempting to import.
- Leave it Zipped: Do not unzip the folder manually. Lightroom Mobile is designed to process the ZIP file directly for XMP imports.
Reviewing these steps helps avoid common errors like missing presets or failed imports, saving you time for what matters most: creating stunning images.
How to Import XMP Presets into Lightroom Mobile
Importing XMP files is the most efficient way to upgrade your mobile editing workflow. EverPixel focuses on providing high-end assets that are easy to implement. Follow these steps for an instant installation:
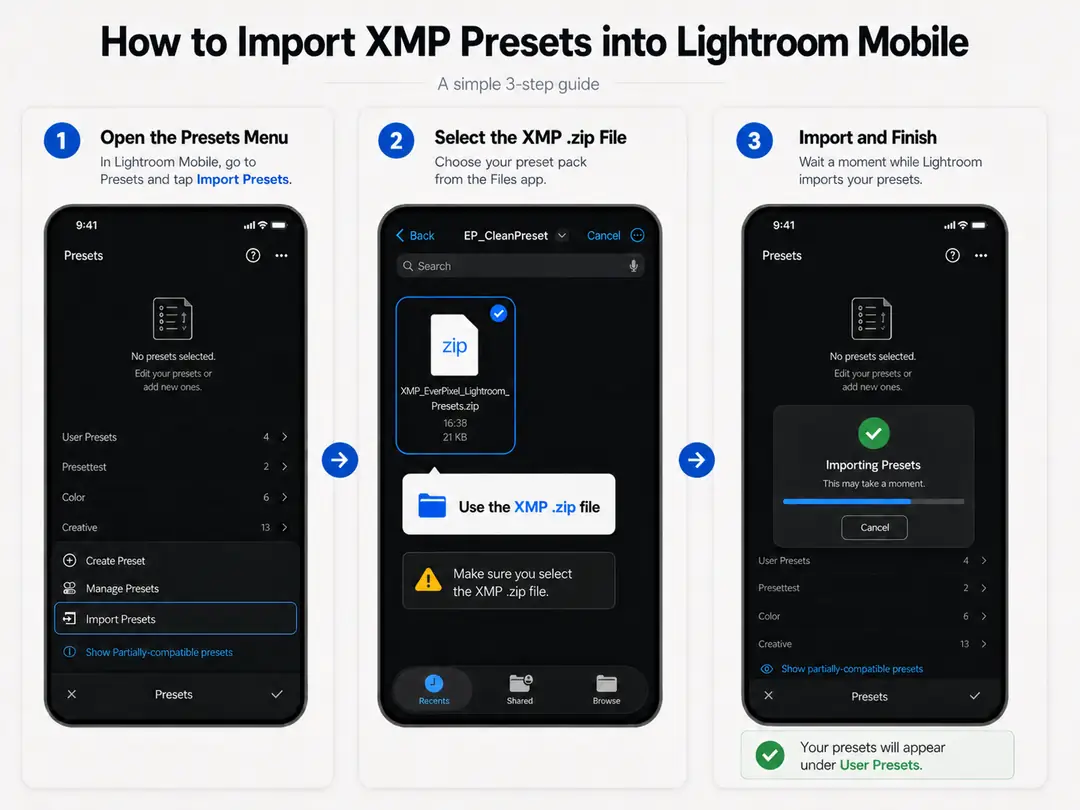
- Launch Lightroom: Open the Lightroom Mobile app on your device.
- Select an Image: Open any photo from your gallery (the editing tools only appear when a photo is active).
- Enter Presets Menu: Tap the Presets icon located in the bottom toolbar.
- Access Options: Tap the three dots (⋯) in the top-right corner of the presets panel.
- Trigger Import: Select Import Presets from the dropdown menu.
- Select the ZIP: Navigate to your files and choose the ZIP file containing your new XMP presets.
Finding Your Tools: Where Do They Appear?
Once imported, your professional tones will be ready to apply with a single tap.
- Automatic Grouping: Presets typically appear inside the Presets panel, neatly organized into folders based on the collection name.
- Expanded View: If you don’t see them immediately, scroll through the list and tap to expand each folder; presets are often nested inside collapsed groups by default.
- User Presets: If a dedicated folder isn't visible, check the "User Presets" group, as Lightroom sometimes defaults to this location during bulk imports.
Ready to test your new installation skills?
Now that you know how easy it is to install presets on your mobile device, it's time to elevate your editing game. Discover professional, studio-tested tones designed for real-world lighting.
Shop Premium Mobile Presets